Brushing Vallejo Metal Color: An Update
Just for fun, I’m going to write a summary of my recent experiences with this product.
First of all, it’s great. Let’s get that straight. This is wonderful stuff. I don’t hate Vallejo. I hate their evil marketing of their lousy Model Color paint but THAT’S NOT WHAT WE’RE TALKNG ABOUT RIGHT NOW.
We’re talking Metal Color and it ROCKS.
I did a video about it and posted some “how to’s” and you’ll just have to search for ’em.
This is an update.
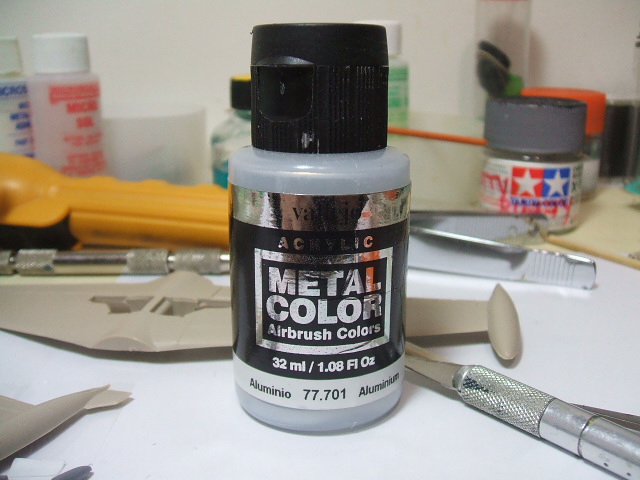
The update is that this paint arrived at my door with a problem or two, if I’m going to brush it. First of all, the horrible packaging.
WHY IS IT HORRIBLE?
Because one must always always always STIR paint, not SHAKE it. Shaking works for airbrushing (I guess) but for brushing you can’t do it unless you want to deal with BUBBLES.
BUBBLES is the six-foot, one inch former lesbian-bar bouncer that will come to your house and kick your ass if you don’t stir your paint.
The second problem that I had with this paint was “graininess.” In other words, the paint was full of little “chunks” and “clumps” that made brushing very challenging. I actually had to sand the lumps out on the F-86 as my loyal viewers will recall.
*ahem*
Recently, with tons of gov’mint covid money burning a hole in my pocket, I decided to try an experiment. Metal Color is not cheap, and if I ruined a bottle I’d have to make a trip down to Scale Model Supplies and pay then an outrageous sum to get a replacement.
But I did the experiment, anyway, for you, my beloved audience, until one of you passes away, in which case I don’t know if I’ll be able to use the term “audience” as that implies “more than one.”
Or does it?
Anyway, I PUT WINDEX IN THE METAL COLOR.
There. I said it. I put one “dropper” of Windex in there and left it overnight to “stew.”
Would it curdle and be ruined? Would it ignite and cause a major incident at the next Condo Assoc. meeting? Who knew?
It did nothing of the sort. The Windex melted all the little lumps. Believe me, I was impressed I can tell you. Many Shubs and Zuuls knew what it was to be roasted in the depths of the Sloar that day I can tell you!
I also learned, from pure experimentation, that this paint really should be applied in a “dry brush” manner. I don’t mean that you need a “super” dry brush. Just not a “full” brush or anything that might run or drip under ANY circumstances.
You apply it “dry” with a “big” brush (one of those wide, flat models that they tell you to get that aren’t good for anything but Future, really) and you use the big brush because a small one is going be slow-going and might produce some odd “whorls” in the finish. A really small brush just wouldn’t work– I don’t think. But YOU’RE FREE TO TRY IT AND REPORT BACK.
Here. I’m talking about a comment here.
So let’s go over what we’ve learned. When you get your first bottle of Vallejo Metal Color (I recommend the “plain” aluminum) you put it in a jar so that you can stir it with a bar-b-que skewer that you’ve cut down. You can use a lot of things to stir but bamboo skewers work for me.
Once it’s stirred, you can check for lumps. If it’s lumpy (probably because somebody shook it!) get some old-formula Windex and put in one dropper and let it sit overnight. Stir again. Now you need a model to paint. Don’t try to paint the trim (anti-glare panels, invasion stripes, etc.) and THEN the metal. Brush on the Metal Color and do the “trim” OVER (on top of) the Metal Color, because you CAN brush paint over the dried Metal Color without any problems.
By the way, one dropper “full” is not FULL by Asperger’s standards. You put the sucky end in the liquid, you squeeze the rubber bulb, and you release the bulb, causing it to suck up a tiny amount of liquid. This is ONE DROPPER FULL. It is ONE MILLILITER (or ml). I HAVE CHECKED THIS AND IT IS TRUE NO MATTER WHAT YOU MAY SUSPECT. The glass part of the dropper is NOT FULL. It’s not even half full, probably. But this is “called” a “dropper full” and it’s one ml.
Now put the wide flat brush into the jar and run it over the lip as much as you can without going crazy, and then brush the Metal Color onto your hand if you’re twelve or onto an appropriate surface like a shoebox or your wife’s shoe if you’re a bit older.
Once the brush has given up all the drippy stuff, begin to brush over the surface of the model like a butler (who says “sir”) does when he’s brushing your tuxedo. Brush brush brush.
It won’t look good on the first pass, but let it dry OVERNIGHT and then apply another. Repeat until you have a metal finish to die for.
NOW– HEY LISTEN UP GODDAM IT!
Now, you need to let this dry for SEVERAL DAYS. That’s right. Several DAYS. Go to a game. Go outside. Feed your tarantula. Let some kids out of the basement. Whatever you do to pass time, DO THAT.
Only after a good, long drying period will you be able to apply charcoal or graphite powder to the surface to make it look like “variations in tone” that happen in “natural metal” finishes on aircraft. Just use Post-its to “mask” off the panels and brush on a little dust from the sandpaper and you have it.
But don’t try it before the Metal Color has a chance to cure.
Thank you for reading this update and now you are free to ask questions that are utterly impertinent.
I’m eager to try this. with two little ones and a Mrs. with asthma, I’ve been using more and more water base, and brushing. I still have a sizable stash of Floquil, Humbrol, and Model Master Enamels, but it’s been probably 5+ years since I’ve used any. Everything last few years has been brushed with my large stash of Acryl, Polly Scale, and now Revell Aqua…however I was using Tamiya Spray bombs for metallic finishes as I could never get a brushed finish I was happy with for metallics. Going to check out your videos and pick up some of this stuff.
I’ve learned that this stuff is quite good– but I’m still learning how to apply it to get the best results. Right now, I’m convinced that multiple coats of “dry brushing” is the best way to proceed. But– I also see that in some cases I got a real “shiny metal” effect and, I have to admit, I’m not sure how I got it. There are two possibilities. Dry brush over a “base” of gray paint of some good quality, then put on a “finishing” coat that “wet” to make it shiny.
OR…
Put on a “wet” coat over a gray base, then add subsequent “dry brush” coats as a kind of “buffing” process.
Both methods involve four or more coats and plenty of time to dry between coats. The first one SOUNDS more logical to me– but my gut tells me that I ACTUALLY DID the second thing and then forgot what I did,
More research is needed…
Some great tips! Sorta reminds me of the guy who posted a tutorial on hyperscale years ago about brushing metalizer, it was almost a dry brushing/buffing process if I recall.
I rewatched your P-47 video, I couldn’t tell with my aging eyes and my 2 six year olds over my shoulder asking questions constantly as I watched it… are you putting this on over a primer coat or bare plastic?
I ordered a bottle of this stuff from my local shop last week. I don’t know if this stuff is hard to find but he had a heck of a time finding it from his regular suppliers (Stevens is one of them). Should hopefully be in next week.
I put it over a “primer” coat. I use dear-old Polly Scale Medium Sea Grey. I won’t waste time trying to fool you– I have no “good reason” to use that particular paint other than “feel.” Polly Scale looks better and better to me as the years pass. I’m tempted to go down to Scale Model Supplies and buy up their supply (if had the money to throw around). It’s “sticky” and it flows well. Very special stuff. Once it’s good and dry, I start to “dry brush” the Metal Color over it. Metal Color, as you will discover, drybrushes in a way that’s almost supernatural. You can brush it for days and days. Like some “tall tale” from the 1800’s. You can dip it once, and paint all week.