Hellcat Part 3
Now hear this.
Looking at the bottom of the Hellcat, you notice one thing. That’s alotta white. White paint is supposed to be yet another bug-bear for brushpainters, and is supposed to send me crying for my airbrush.
Not so fast.
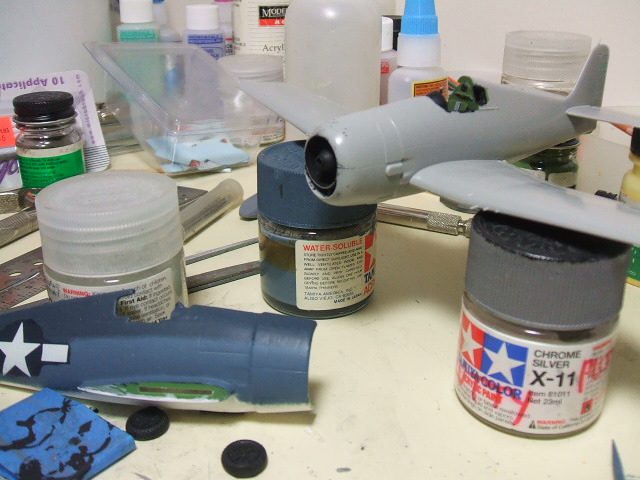
In this photo, which I’ll reproduce here in addition to the wonderful Cinerama version above, we have the Matchbox Hellcat fuselage half that was used as a “test dummy” to prepare for this build. You didn’t think that I just threw it together, did you? It may look like I just grab Hobbyboss kits off the shelf and toss them up in the air and have them fall fully assembled, but in addition to that I also spend a great deal of time and energy preparing the paint. As I’ve mentioned before, I don’t really care much about building. It’s the paint–the chemistry, the color, the application process which intrigues me.

That ancient kit from the venerable Matchbox of England stank so badly it caused me to have to hire a fumigator, but it did come in handy for destructive testing. There you see the colors, applied and the stippling completed to render the truly jazzy Navy camo of a few months in the middle of the war– in between the failure of the blue-gray and the rational adoption of the slick overall dark sea blue.
This camouflage was also a failure. Blue is a tricky pigment. Expensive and so difficult to work with that most of world didn’t use it in large quantities for anything. Despite rumors to the contrary, I’ve never seen believable evidence that anybody else painted their planes blue. But the U.S. Navy wasn’t just anybody else. They wanted blue planes and the result was a rainbow of colors– all the result of fading under the tropical sun.
If you have not experienced the tropical sun, you really don’t know what you’re talking about when you speculate on its ability to fade pigment. It will burn your hide off and bleach everything to a crackly crunch. I left Kunsan Air Base, Korea in 1983 with white skin and a green badge on my pocket giving me access to the flightline. I returned from the Philippines two months later with a yellow line badge and dark brown skin.
I can only imagine the effect of these high-energy ultra-violet rays on this relatively unstable blue paint. Hellcats in battle over the Philippines turned grey and pale blue and every other color. The fleet’s aviation assets looked downright funky. There is no way to write “rules” on how these aircraft should look as models, except to say get a color photo and try to copy it. If you can’t find a color photo, then make something up. Just don’t believe any “expert” who claims that the aircraft had a “standard” appearance. They didn’t.
Now getting back to white. That Hellcat belly is seriously white. To tame it I’m going to use Tamiya GLOSS white. It will go on last, then allowed to dry for a good long time, then a clear flat will be applied, then the stippling. The idea here is to create a replica of one of these Hellcats BEFORE it was subjected to the tropical sun blast. Furthermore, the underside of this airplane will be allowed to remain somewhat white, despite the reality of a huge amount of oil, grease, exhaust and other gunk dripping down through the airframe and squeezing out between the panels on the under-surface. Aircraft bellies get pretty filthy. That’s the true measure of a weathering job– is the belly filthy?
Finally, a word about paint compatibility. Never, ever apply a flat paint over a gloss one. Never, unless you “flatten” the gloss paint first. If you ignore this advice, you are not allowed to cry on me. I warned you. Gloss over flat is fine (usually). The only exception to this rule that I have ever seen is the amazing Vallejo Metal Color, which can be overpainted with flat paint. But that stuff is one of the items recovered at Roswell, so I’m not too surprised.
I’m planning on making a video of the basic painting and maybe one on the stippling process.
That is all.
I am glad you are going to make a video of your painting process, especially the way in which you use the brush. Looking forward to watching it.
Oh, and thanks for the tip on the white. Have you tried other brand gloss whites? If so, do they work as well as the tamiya?
The Tamiya paint is unique. It has the uncanny ability to level itself out and dry to a high gloss no matter what. It’s also difficult to apply because multiple coats are required and each new coat eats the older ones. You only have a split-second to get the new coat on and then leave it alone. It also requires a week or two to fully cure. I’ll be certain to include it in a future video where I’m painting the belly of the Hellcat.
Yes, you outlined the issue I have had with tamiya in the recent past.
Funny thing though; I still have a few old Tamiya acrylics that don’t do that, all in the old 23ml jars. You can go and paint over them after a few hours and they are fine! I used to use them when I was young and the few I have left still work that way, so of course when I recently came back to the hobby, I went out and bought a load of Tamiya acrylics along with the usual Humbrol enamels and so on. And of course these Tamiyas have the problem everyone describes….odd eh? I am guessing there was a formula change between the 80s and now.
Looking forward to the videos mate. I very much wish to learn your way of doing things, and see if I can incorporate them into my own styles.